Flashing & attaching

I can’t even guess how many times we’ve been back and forth to Lowe’s and Home Depot… part of the trouble with having no idea what we’re doing is that we often omit some crucial component from our shopping list, or run out of material, or break a tool…we’re definitely making slow but sure progress, and most of the time it’s even fun (hopefully our neighbors aren’t too sensitive to curse words)!

Aluminum flashing

As I mentioned in the last post, we built the floor frame in three main sections. We decided that flashing each piece independently would be a lot easier than the alternative — connecting them together, lifting and flipping over the entire frame, and flashing it as one giant piece. We’re adding pieces of overlap flashing at the joints between the major sections… unfortunately, this meant that we didn’t buy quite enough flashing and were delayed another couple of days (we don’t get much work done outside the weekends, since Rob has an actual 9-5ish job).

Doing the flashing is not too difficult (we’re using 20″ wide aluminum rolls)… but it’s maybe impossible to get it totally flat. It’s especially bubbly in the middle section of floor, which was apparently very slightly off square when we screwed in the flashing — when we hammered it into place between the two end pieces, the flashing went a little crazy. Hopefully it won’t matter too much… we have a 2″ overlap between sheets, and the rigid foam insulation should diminish any serious bubbles.

Attaching the frame to the trailer

We’re using a couple of different attachments to permanently affix the house to the trailer. Our trailer has handy 1/8″ thick flanges running along the side which provide our main attachment points. We’re using 3/8″ x 1 1/2″ lag screws to come up through the flange into the wood. These go along each side, except in the wheel well section.

Second, we’re using L-bracket strong-ties to attach each joist to the two main steel decking beams that run the length of the trailer. We’re alternating directions on these (or more accurately, applying them in random directions based on where it’s easier to sit).

Now, some handy advice I wish we had had before starting to drill (thanks YouTube)… steel trailers are really hard to drill through. These few things will make your life so much easier:

  • Use the right drill bit! I highly recommend a cobalt one (titanium was pretty much useless). We bought a second after breaking the first…
  • Go slowly — it seemed like using high RPMs would speed up the process, but it doesn’t.
  • Use a drilling fluid!! We didn’t buy anything fancy — we just put a little motor oil in a water bottle and poked a small hole in the top. Instantly made drilling 100x faster.

You may have noticed that we haven’t leveled our trailer yet… because of the brilliant way we decided to attach the scissor jacks, leveling at this stage would be pointless — our bolts need to go through not only the trailer, but also the floor framing, subfloor, and steel studs. Yay us! Hopefully leveling once we get the subfloor on won’t present a problem.

Floor framing

We had a slight set back before we could really get going on the build, but we have made a lot of progress since my last update!

Rust problems!!

Just a couple weeks after our trailer arrived, we noticed that there was a significant amount of rust developing on the bottom of some of the pieces:

IMG_4216

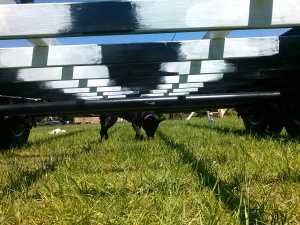
Needless to say, this was pretty disappointing… we live fairly near the coast, and things rust here quickly, but this was pretty ridiculous. I had to spend several days under the trailer removing rust (with a phosphoric acid-based cleaner). I then sprayed a cold galvanizing spray on the metal (which seemed to have escaped being painted properly) to protect it. Then I learned that only latex based paints can be put over galvanized metal, so I had to do a brushed-on latex primer, followed by a rust resistant black enamel spray.

CAM00031

This was a lot of work that I didn’t anticipate, and I got way too familiar with the view from underneath the trailer (including helpful doggie):

CAM00032

I talked to Tiny Home Builders, who we ordered our trailer from, about this problem… and they were very responsive and apologetic. They gave us a free lifetime membership to their video series on tiny house building (I’ve just a watched a couple so far, but it seems pretty good), and they agreed to pay for the rust removing and painting supplies (unfortunately, I didn’t ask for quite enough; I didn’t realize how many cans of spray paint it would take!). They also said they’ve talked to manufacturer and will be ramping up their quality control measures.

Floor framing

Once that was taken care of, we started on the floor framing. I really didn’t want to do any wood framing, or have a floor frame at all… a lot of people end up putting the insulation between the joists & decking of the trailer, saving a few inches. However, the more I learned about thermal bridging, the worse of a solution this seemed. If you don’t have an insulating layer outside of steel framing members (including steel trailer beams), heat transfer can be really significant, reducing the R-value of your insulation between members by more than 50% [1]. There’s no real way to isolate the steel trailer from the inside of your house without doing some kind of framing and insulation above the deck — at least nothing reasonable I could come up with — so I succumbed to the idea of a wooden floor frame (thermal bridging exists with wood, but is much less severe).

We’re using 2×3 members for the joists, saving an inch over regular 2x4s. They seem to be plenty stiff enough @ 16″ on-center, and we’ll be putting 2 1/4″ of polyiso insulation between them, giving us a floor R-value of 14.4. We built three main pieces – one on each side of the wheel wells, and one in the center:

The extra piece that sticks out a few inches near the wheel well will support our front door — since we’re doing thick continuous insulation outside the framing, and we’ll have an out-swing door, this will allow the door to be flush with the siding.

I’ve got to say, working with wood is a little bit of a PITA — a lot of the pieces were twisted, not straight or level, etc… I’m hoping that the steel studs will be easier to deal with in this respect.

In progress…

We’re almost finished with the aluminum flashing and attaching the frame permanently to the trailer — I’ll have more updates on that later this week!

References

[1] IMPROVING ENERGY PERFORMANCE OF STEEL STUD WALLS, ORNL

Dropping dollars

This week I’ve been ordering a lot of building materials (and cleaning out the garage so that they have a place to stay)…

You may be wondering, how much does a tiny house cost? I’ve heard it’s possible to build a house of almost all salvaged materials, saving a lot of money… Unfortunately, weeks of searching craigslist and local building salvage places hasn’t turned up many significant finds (I did get a nearly full roll of Tyvek for $40)! Since we really want to get going with the build and have some pretty specific requirements (tempered windows, steel studs, etc), we’re going with mostly new materials for the structure. Our goal budget for the house (including solar power) is $30,000, most of which we’ve saved in cash so far… although I don’t know the final prices of everything yet, this will allow us to use some nice materials, but isn’t totally crazy. You can follow along with our actual spending on this Google doc.

You’ve probably heard that if you spend a lot (over $2500) at Lowe’s or Home Depot, you can send your quote back to the ‘bid room’ and get a better deal! My experience is that it’s kind of true… I gave the same materials and windows list to both Home Depot and Lowe’s, totaling about $4300.

Home Depot quoted me a whopping $7 off. Whoo-hoo.

Lowe’s, on the other hand, has been awesome. I really have to give a shout-out to Greg at the Melbourne store (window department) — he’s been super helpful with all the recommendations, and he’s been working with me on getting my quote. Although their windows were about $120 more initially (exact same windows, Jeld-Wen is sold at both stores), he agreed to match Home Depot + 10% off, and ended up doing even better than that. On the rest of the materials, he got me another ~$200 off, for a total savings of over $500!

Being an Atlanta native, I was biased towards Home Depot at the beginning, but Lowe’s has really won me over. You can also get nice 10% coupon for Lowe’s by picking up a ‘mover’s packet’ at the post office, or signing up for their mover’s program.

Unfortunately, it’s been raining a lot here (so $100 of our budget went to a really big tarp), and we haven’t done much more than move the trailer to it’s build location in the backyard. We’re hoping to get started on the real stuff this weekend, now that we have $8000 of materials sitting in the garage…